Tutorial - Arc Flash Hazard Analysis
This tutorial demonstrates how to use several of EasyPower’s arc flash analysis features. EasyPower ArcFlash™ is integrated with the program’s short circuit analysis feature, so the interfaces are similar.
Short Circuit Focus
To perform an arc flash analysis, you must be in the Short Circuit focus.
- From the File menu, click Open File.
- Open the Protection-1.dez file in your Samples directory.
- Click
 Maximize on the one-line window, if needed, to fill the session window with the one-line.
 - Click
 Short Circuit to open the Short Circuit focus.
Tip: If you are viewing the Start Page, you can click Open One-line instead.
Calculating Arc Flash Hazards and Currents
- Click
 Arc Flash if it is not already selected.
 - Click
 Fault Bus(es). The program displays the arc flash boundaries (AFB) and incident energies.
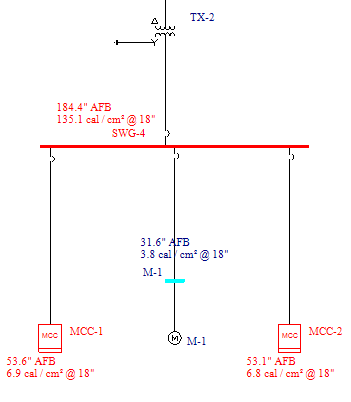
Figure 1: Arc Flash Results on the One-line
Detailed Output and the Spreadsheet
- Click
 SC Options. In the Short Circuit Options dialog box, select the
Arc Flash Hazard tab.
SC Options. In the Short Circuit Options dialog box, select the
Arc Flash Hazard tab.
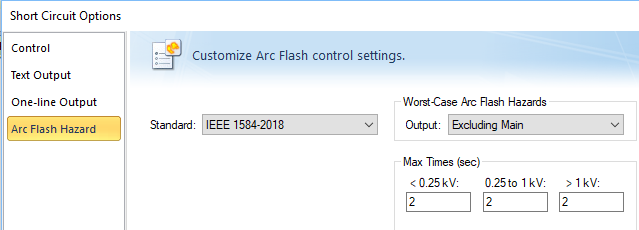
Figure 2: Short Circuit Options - Arc Flash Hazards
- Under Worst Case Arc Flash Hazards, change the Output to Detailed, and then click OK.
- Double-click on SWG-4 to fault the bus, and then click
 Arrange for Arc Flash or press F8 to view the Arc Flash Hazard Report. You can also select
Arc Flash Hazard Report under the
Window button to display the report.
Arrange for Arc Flash or press F8 to view the Arc Flash Hazard Report. You can also select
Arc Flash Hazard Report under the
Window button to display the report.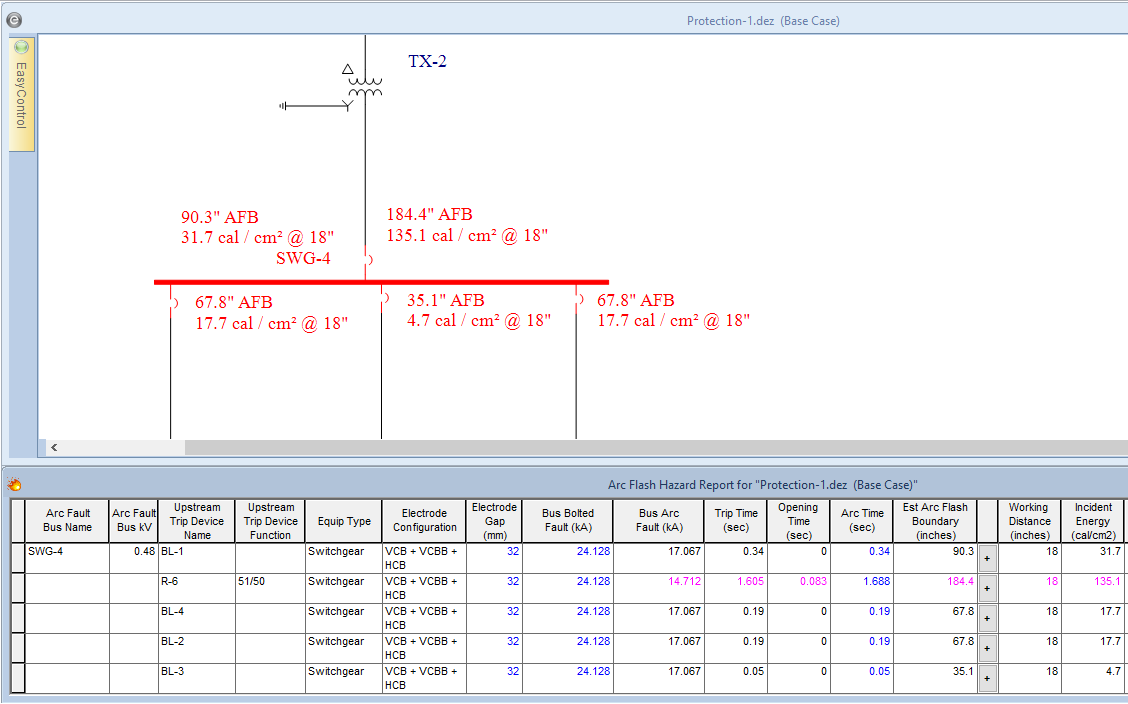
Figure 3: Arc Flash Hazard Spreadsheet Output
A more detailed set of arc flash results is provided for the arcing fault. The results on the downstream feeder breakers represent the hazards one would incur when working just downstream of those breakers.
Now, try experimenting with the spreadsheet and arc flash options.
Note: To access the Short Circuit and Arc Flash Options, the one-line must be the selected window.
Arc Flash Hazard Labels
Printing Arc Flash Labels
You can print arc flash labels from the Arc Flash Hazard Report. Right-click on a spreadsheet row and select either Print Label for Selected Device or Print Label for All Devices.
Note: This feature is not available in the Demo version of EasyPower.
For further details regarding arc flash hazard labels including label printing options and customizable label options, refer to the "Arc Flash Hazard Analysis" topic in Help.
Creating Energized Electrical Work Permits
You can create a work permit, as follows:
- Close the arc flash hazard label if it is still open.
- On the one-line, right-click on SWG-4 and select Arc Flash Work Permit.
- In the Work Task Dialog, select the Work on Live Parts check box, and then click OK.
EasyPower opens Microsoft Word and displays a work permit with data based on calculated arc flash hazards and the selected work task.
Note: In the Demo version, you cannot select a work task, and only a sample work permit is created.

Figure 4: Work Permit
Some items to note:
- Work permits can be quickly created for each bus in EasyPower. You can automatically create a hyperlink for the work permit and associate it with the equipment item by selecting the check box in the Work Task Dialog. The hyperlink is available in the equipment's data dialog box on the Hyperlinks tab.
- You can customize the work permit template. The default template is named WPTemplate.docx and can be modified using Microsoft Word. You can create a custom template with a new name, if desired, and specify the new template in Tools > Options > File Locations. See "Editing Work Permits" in Help for more information.
- You can customize the Work Task Dialog information by modifying the Stdlib.mdb library in EasyPower.
Coordination Integration
To perform coordination integration, do the following:
- Close the work permit template if it is still open.
- Click
 Coordination.
 - Click
SC Options, and select the
Arc Flash Hazard tab.
- In Arc Flash Hazard Options, under Worst Case Arc Flash Hazards, change Output to Including Main, and then click OK.
- Click
 Open TCC. In the Open TCC dialog box, select TCC-1 and then click
Open. You can maximize the window, if needed.
Open TCC. In the Open TCC dialog box, select TCC-1 and then click
Open. You can maximize the window, if needed. - Click Arc Flash. The arc flash results appear on the TCC one-line.
- Drag the short-time delay of the purple BL-1 SST curve (on the right) up and down.
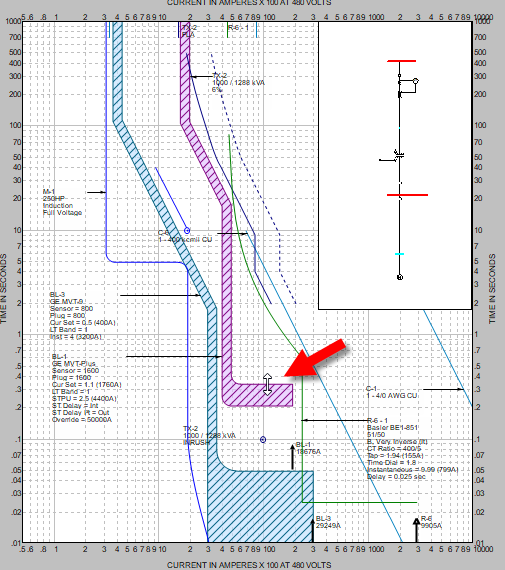
Figure 5: Coordination Integration in EasyPower
- Observe that the arc flash results automatically update at the lower section of the one-line. This provides a useful demonstration of the influence that the settings of protective devices have on arc flash hazards.
- To close the TCC window, click
on the lower
 on the top right corner of the window.
If you select to save your changes, the base case is updated.
on the top right corner of the window.
If you select to save your changes, the base case is updated.
User-Defined Times
- On the EasyPower one-line, click
 Database Edit to open the Database Edit focus. When you change to the database focus, if any temporary changes have been made that are not yet stored, you are asked if you want to save them. Click No for now.
 - Double-click SWG-4. In the Bus Data dialog box, select the Arc Flash Hazard tab.
- In the Trip Times for this Bus list, select User Defined Times.
- Fill in the device clearing times. Up to four device clearing times can be user-specified for each bus.
- Click OK to save your changes.
Note: EasyPower strongly recommends that arc flash calculations be performed using the actual protective device clearing times. This is automatic if you own EasyPower’s coordination program PowerProtector™ and have entered protective device data for each device.
Conclusion
This has been a brief overview of EasyPower’s Arc Flash Hazard program. The EasyPower Help topics cover this and other features in greater
depth. To open Help, click  Help in the upper-right corner of the EasyPower window or press F1.
More Information
| EasyPower® Tutorials |