
Double-clicking on any area inside the Title Block enables you to edit it. Use the Title Block Data tab to enter the company name, the TCC Curve name, revision number, date, text alignment, and any comments that you want in the Title Block.
You can also insert a company logo. Click Browse to insert a company logo from a file. EasyPower supports logos in various formats such as BMP, GIF, and JPG.
You can enter default data and then click Default to store the data as your new default values for all new TCCs that you create.
Figure 1: Format Title Block Dialog Box
The Appearance tab of the Title Block dialog box enables you to edit the border color, thickness, and line style. It also lets you select a color for the Title Block under Fill Color, along with text color. You must click Apply or OK for the default settings to be stored for future use.
You may also insert a one-line diagram onto TCC Curve plot by choosing the  One-Line check box in the TCC ribbon. This inserts the one-line diagram of the items plotted onto the TCC plot. You can move the one-line diagram to any location on the TCC plot by clicking anywhere on the box and dragging it to the desired location.
You can format the one-line on the TCC plot by clicking the arrow below  Format TCC and clicking
  One-line on TCC. You can format the border and the fill color. To save the format as default setting, click Default.
There are several ways to zoom and pan on the coordination curves. If you have a mouse with a wheel, the simplest way is to roll forward to zoom in, and roll backward to zoom out. Another method is to use the zoom buttons.  Zoom Out Full restores to the original zoom size, with the time axis visible from 0.01 seconds to 1000 seconds.
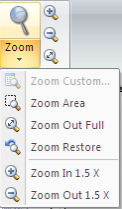
Figure 2: Zoom Buttons in the TCC ribbon
You can also control zoom from the slider bar and the zoom buttons on the right side of the status bar as shown in the picture below.

Figure 3: Zoom Control Slider
You can pan the TCC by pressing down the mouse wheel and moving the mouse. Panning move the view within the TCC in the direction you move the mouse. The pointer changes to a  symbol to indicate the window is being panned.
You can insert a note on the curve with a leader that points to the area on the curve that you want to note. To do this, click the arrow below  Note in the ribbon and click
  Note with Leader. Place the text box where you would like for the note to appear, and drag the red portion of the leader to the part of the curve that you would like to note.
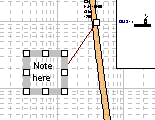
Figure 4: Note with Leader
You can also add a note without a leader on the curve by clicking Note in the TCC ribbon.
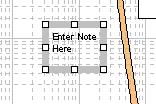
Figure 5: Note without Leader
You can adjust the font, color, leader, and border of your note by right-clicking on the note and selecting Format Note. Use the tabbed screens to navigate between font, leader, and appearance to change the desired settings. Right-clicking on the note also gives you options to cut, copy, paste, delete, and edit the text of the note.
Coordination enables you to format several aspects of the TCC plot area. You can format the plot area by right-clicking on a blank area in the TCC and selecting Format Plot Area.
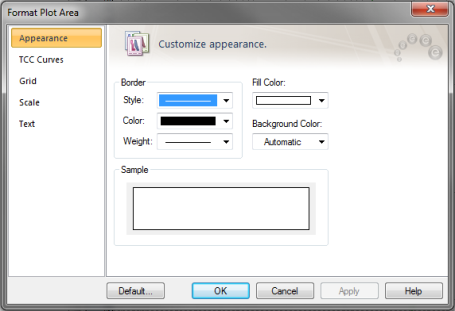
Figure 6: Format Plot Area Dialog Box
The Format Plot Area dialog box contains the following tabs:
Appearance: You can change the border size, color, style, weight, and background color of the plot area.
TCC Curves: Formats all curves in the TCC plot as Opaque or Semitransparent. When curves are selected as opaque, the individual curves can be brought forward or sent backward. This is not applicable when the curves are semitransparent.
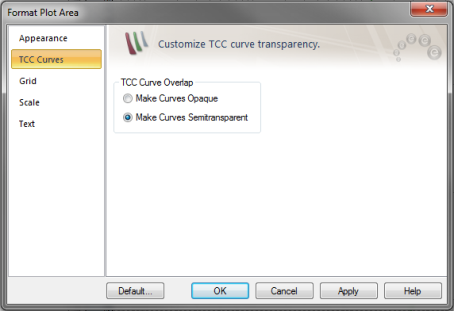
Figure 7: TCC Curves tab of Format Plot Area Dialog Box
![]()
Figure 8: TCC Curves: Opaque (left); Semitransparent (right)
Grid: Use to change the line style and color for both x- and y- major and minor axes.
Scale: Use to set the Reference kV and scale for the curve.
Font: Use to change the size and color of the font around the curve.
By changing the Reference kV and Current Scale values in the Scale tab of the Format Plot Area dialog box, you can modify the current scale (or the horizontal axis) of the TCC plot. The time scale remains the same.
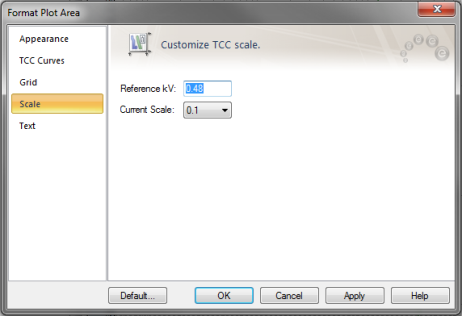
Figure 9: Scale Tab of Format Plot Area Dialog Box
Reference kV: Select the voltage level through which the current is to be seen. The method of calculation is similar to those involving transformation ratios. When the TCC of a high voltage device is plotted with the Reference kV set to the low voltage, then the current shown in the plot is equal to the actual current times the ratio of device voltage to Reference kV.
Current Scale: Current Scale sets what one unit on the current axis equals to. Changing the scale shifts the TCC plot left or right. The choices for Current Scale values are 0.1, 1, 10, 100, etc. Unlike Reference kV, changing current scale does not change the current values in the TCC plot.
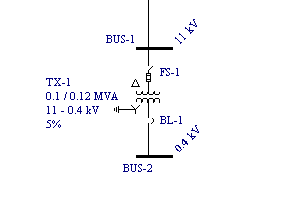
Figure 10: One-line Example with Two Voltage Levels
In the figure above, the transformer TX-1 is protected by the high voltage fuse FS-1 at 11kV and the low voltage breaker BL-1 at 0.4kV. The TCC plot of both devices is shown below. Notice that the current values in the TCC plots are higher for reference voltage of 0.4kV.
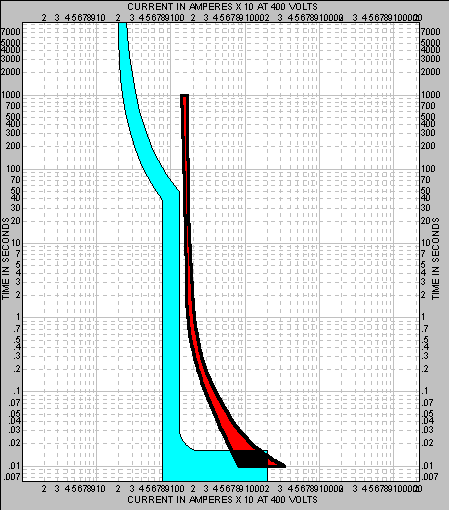
Figure 11: TCC Plot for Current Scale of 10 and Reference kV of 0.4
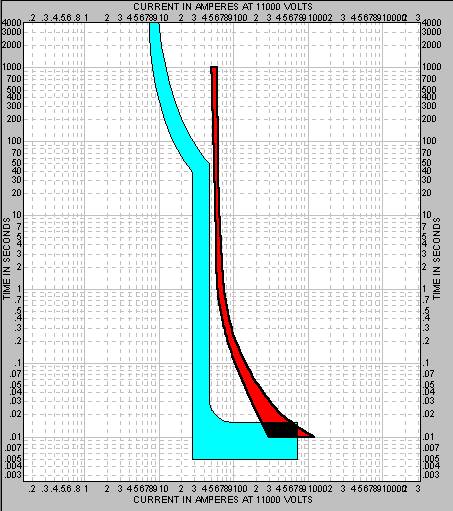
Figure 12: TCC Plot for Current Scale of 1 and Reference kV of 11
Click Default at the bottom of the Format Plot Area dialog box to change the default settings to current settings. The settings for Appearance, Grid and Text tabs are stored as default. However, the settings in the Scale tab are not stored as default.
Figure 13: Default Dialog Box for Format Plot Area
| Coordination with PowerProtector™ |