 Short Circuit to open the Short Circuit focus.
This tutorial demonstrates how to use several of EasyPower’s arc flash analysis features. EasyPower ArcFlashä is integrated with the program’s short circuit analysis feature, so the interfaces are similar.
To perform an arc flash analysis, you must be in the Short Circuit focus.
Short Circuit to open the Short Circuit focus.Tip: Hold down the mouse wheel while dragging to move the view of the one-line. You can roll the mouse wheel or use the zoom controls in the lower right side of the window to control how large the one-line items appear.
 Arc Flash.
  Fault Bus(es). The program displays the arc flash boundaries (AFB), incident energies, and recommended personal protective equipment (PPE) for operation near the energized buses in the system. For example, a PPE requirement of three (3) is recommended (based on IEEE 1584) for any person working within 18 inches of energized SWG‑4.
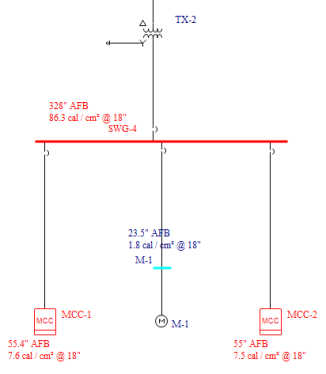
Figure 1: Arc Flash Results on the One-line
 SC Options in the ribbon. In the Short Circuit Options dialog box, select the
Arc Flash Hazard tab.
SC Options in the ribbon. In the Short Circuit Options dialog box, select the
Arc Flash Hazard tab.
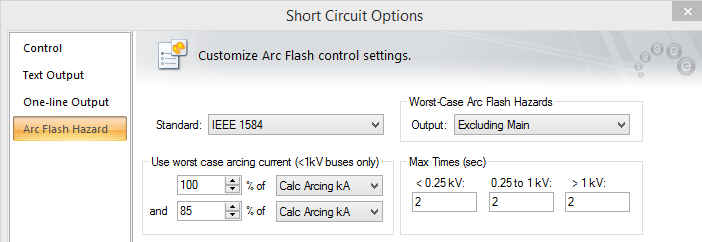
Figure 2: Short Circuit Options - Arc Flash Hazards
 Arrange for Arc Flash or press F8 to view the Arc Flash Hazard Report. You can also select
Arc Flash Hazard Report under the
Window button to display the report.
Arrange for Arc Flash or press F8 to view the Arc Flash Hazard Report. You can also select
Arc Flash Hazard Report under the
Window button to display the report.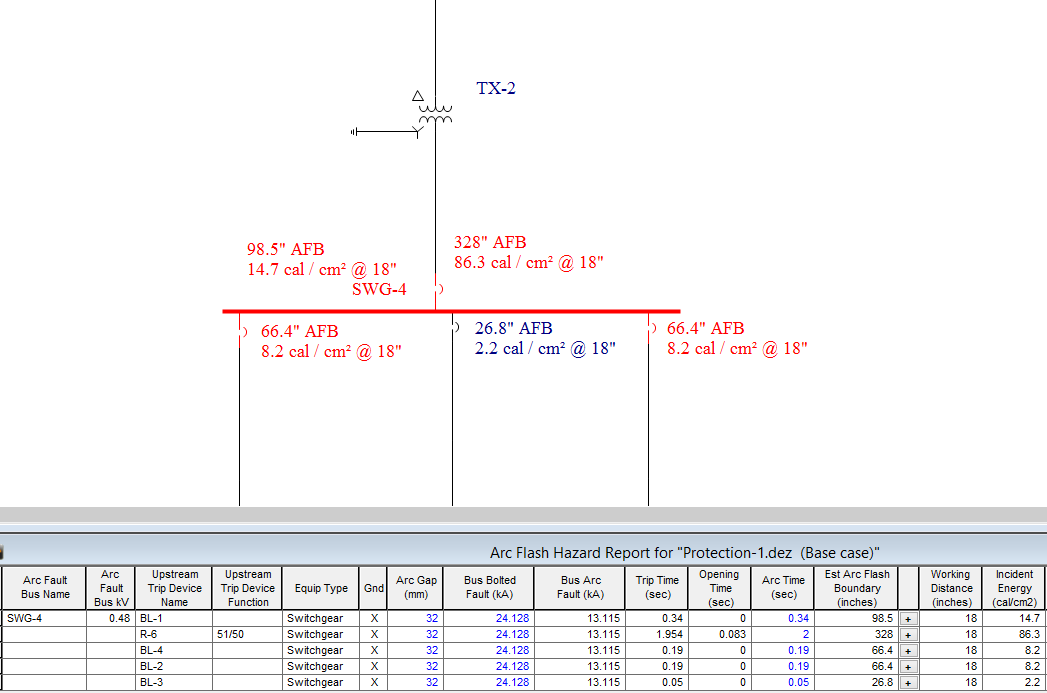
Figure 3: Arc Flash Hazard Spreadsheet Output
A more detailed set of arc flash results is provided for the arcing fault. The results on the downstream feeder breakers represent the hazards one would incur when working just downstream of those breakers.
Now, try experimenting with the spreadsheet and arc flash options.
Note: To access the Short Circuit and Arc Flash Options, the one-line must be active. To activate the one-line, select Protection-1 from the Window button.
You can print arc flash labels from the Arc Flash Hazard Report. Right-click on a spreadsheet row and select either Print Label for Current Device or Print Label for All Devices.
Note: This feature is not available in the Demo version.
For further details regarding arc flash hazard labels including label printing options and customizable label options, refer to the "Arc Flash Hazard Analysis" topic in Help.
You can create a work permit, as follows:
EasyPower opens Microsoft Word and displays a work permit with data based on calculated arc flash hazards and the selected work task.
Note: In the Demo version, you cannot select a work task, and only a sample work permit is created.

Some items to note:
To perform coordination integration, do the following:
 Coordination. SC Options, and select the
Arc Flash Hazard tab.
Coordination. SC Options, and select the
Arc Flash Hazard tab. Open TCC. In the Open TCC dialog box, select TCC-1 and click
Open.
Open TCC. In the Open TCC dialog box, select TCC-1 and click
Open.  Arc Flash. The arc flash results appear on the TCC one-line.
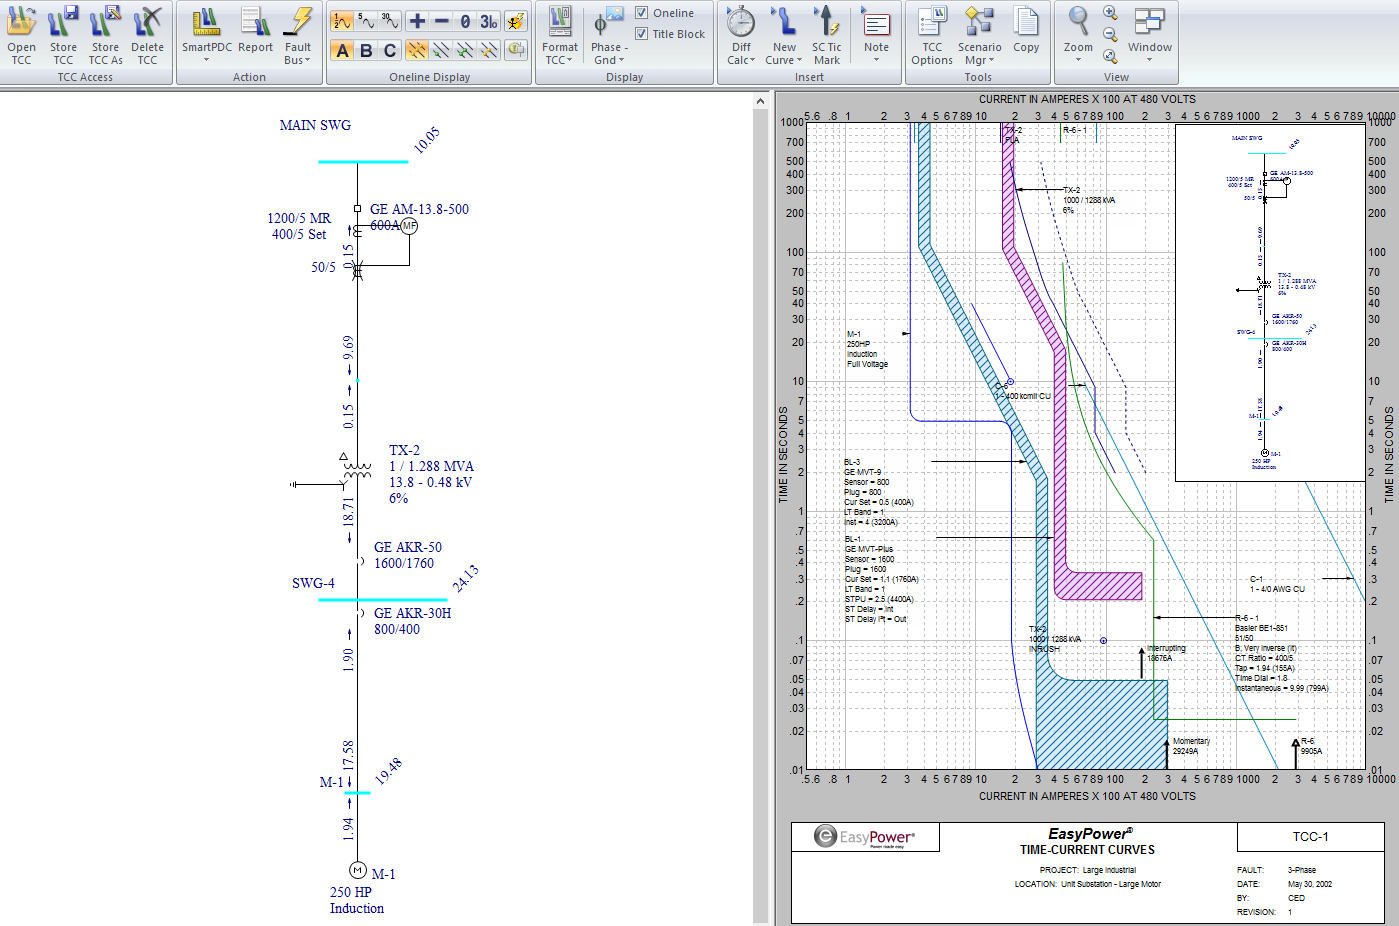
Figure 4: Coordination Integration in EasyPower
 on the top right corner of the window.
 Database Edit to open the Database Edit focus. Double-click SWG-4. In the Bus Data dialog box, select the
Arc Flash Hazard tab.
Database Edit to open the Database Edit focus. Double-click SWG-4. In the Bus Data dialog box, select the
Arc Flash Hazard tab.
Note: EasyPower strongly recommends that arc flash calculations be performed using the actual protective device clearing times. This is automatic if you own EasyPower’s coordination program PowerProtector™ and have entered protective device data for each device.
This has been a brief overview of EasyPower’s Arc Flash Hazard program. The EasyPower User Guide and Help system cover these and other arc flash features in greater depth.