Entering Item Data Using Tables
The EasyPower database is made up of separate equipment tables—essentially, lists of equipment items organized similar to a spreadsheet. When you open a piece of equipment such as a bus, you see the database item you selected, but other equipment items of the same type are also available from the same dialog box. Use the toolbar to move around in the table, which is similar to moving up or down a list of items in a spreadsheet. You can also find, copy, paste, or restore item data. When you are finished editing a database table, click OK.
Database Dialog Box Toolbar
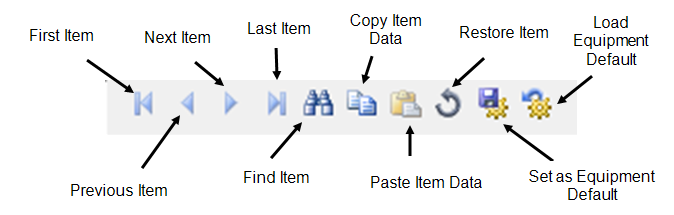
Figure 1: Data Dialog Box Toolbar
Moving Around in the Table
When a dialog box is opened, it displays the item you were editing the last time that dialog box was open. In the dialog box's toolbar, there are four movement buttons:  ,
,  ,
,  , and
, and  . These buttons let you move to other items in the table which are listed according to the alphabetical order of their ID names.
Any changes you make to an item's data in the dialog box are saved when you do one of the following:
- Move to a different item in the table.
- Close the table by clicking OK.
Note: If you close the table using Cancel, the changes you made to the current item will be discarded, but changes made to other items while the dialog box was in use are retained.
Resetting Changes Made to the Current Item
Clicking  Restore returns the current item's database fields to what they were when you opened it, before you started making changes. After you click OK or move to a different item, those changes are made permanent and cannot be reset.
Copying Another Item's Database Information
Copy an item's database information, as follows:
- Open the item from which you want to copy data.
- Click
 Copy to take the current item's data and place it on the clipboard.
 - Open the destination item.
- Click
 Paste. This takes the data stored on the clipboard and applies it to the current item.
Note: The destination item's type must match the source item's type.
Saving Equipment Defaults
If you have settings on your equipment that you want to use on other equipment items of the same type, you can save them as default settings. To save the equipment defaults:
- Open the item from which you want to save equipment defaults.
- Make any changes to the item that you want saved as default settings.
- Click
 Save Equipment Defaults.
 - You are asked if you want to overwrite the existing default equipment data. To overwrite the existing equipment default data with new data from the equipment dialog box, click Yes.
Note: You can control the location where the equipment default database file is stored using File Locations.
Reading Equipment Defaults
After you have saved default equipment settings, you can read them in to another equipment item, as follows:
- Open the equipment item to which you want to save the equipment defaults.
- Click
 Read Equipment Defaults.
 - You are warned that you are about to override the content with the default data. To override the existing content with the stored default data, click Yes.
- Click OK to save your changes.
Note: For new utilities, generators, motors, and capacitors, the kV is blank even if a default kV has been set in equipment settings. This is because the kV is related to the bus to which the equipment is connected and it must be specified manually.
Connecting an Item Using Its Database Dialog Box
To specify connectivity between an item and the buses to which it is attached, type the bus names in the item's database dialog box or select it from the list. Note that it is easier to establish connections using the dynamic one-line diagram as described in Adding Items to the One-line. You must establish bus connections before you can click OK.
More Information
| Making One-line Diagrams | |
| Entering Item Data Using the One-line | |
| Copying an Item's Database Information |