Customizing the Device Library
The device library is fully user-definable. This means you can move the rows around, organizing them as you see fit. You can also add and delete manufacturers, types, styles and even the data of a particular style.
Note: The EasyPower standard device library is named Stdlib.mdb. If EasyPower updates this library, any customized changes are lost. To avoid this, you might want to rename your standard device library file. You can also use the Import EasyPower Library Utility to import changes from one library to another. See Updating a Customized Device Library for more information.
Selecting Items
Selecting an item in the EasyPower library is simple and similar to most major spreadsheet programs.
Selecting a cell: Place the pointer over any data cell and click to select that cell. A left mouse click simply selects the cell, whereas a right mouse click provides you with a list of edit options to choose from.
Selecting a range of cells: Place the pointer over the first or last data cell and using the left mouse button, click and drag the pointer the opposite end of the range. The selected range becomes highlighted. You can drag the pointer in any direction; from down to up, right to left or lower right to upper left. Dragging the pointer enables you to select several rows, several columns, or any portion from two data cells to the entire sheet.
Selecting a column: To select a column, place the pointer in the header above that column, and the pointer changes to an ![]() arrow. Click the mouse button, and the entire column will be highlighted indicating a selected state. A left mouse click simply selects the column, whereas a right mouse click provides you with a list of edit options to choose from. To select a range of columns, drag the pointer keeping the left mouse button pressed.
arrow. Click the mouse button, and the entire column will be highlighted indicating a selected state. A left mouse click simply selects the column, whereas a right mouse click provides you with a list of edit options to choose from. To select a range of columns, drag the pointer keeping the left mouse button pressed.
Selecting a row: To select a row, place the pointer at the row label on the left side of the row, and click when the ![]() arrow appears. The entire row will be highlighted indicating a selected state. A left mouse click simply selects the row, whereas a right mouse click provides you with a list of edit options to choose from. To select a range of rows, drag the pointer keeping the left mouse button pressed.
arrow appears. The entire row will be highlighted indicating a selected state. A left mouse click simply selects the row, whereas a right mouse click provides you with a list of edit options to choose from. To select a range of rows, drag the pointer keeping the left mouse button pressed.
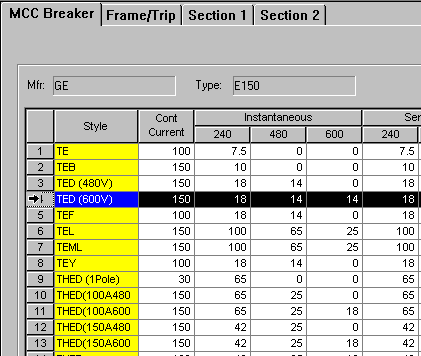
Figure 1: Selecting a Device Library Row
Selecting the entire sheet: You can select the entire sheet by clicking on the top half of the block in the upper left corner.
Select All: This feature is applicable only to text fields. In the text edit field, click the right mouse button to view the edit options. Then click Select All.
Cut, Copy, and Paste
Using these editing commands in the device library is similar to the way they are used elsewhere; however, there are a few differences. Style, sizes and temperatures listed in yellow columns cannot have duplicate listings and cannot be left blank.
Cut: The Cut feature is applicable only to text edit fields, not to spreadsheets. Select the text you want to cut. Click the right mouse button to view the edit options and click Cut.
Copy: Select the data you want to copy. Press CTRL+C on the keyboard. You may copy a row, a column, or any section of the sheet other than the headers and the row markers. You may also click the right mouse button to view the edit options and click Copy cell(s).
Paste: After you have copied the data to the clipboard, you may copy to a different place on the sheet, a different sheet, or even into a different program. However, the data cells in EasyPower's device library have certain ranges assigned to them; you cannot paste a number into a cell if it is outside of that range. To paste data, select the cell where you want to paste the data and press CTRL+V on the keyboard. You can also click the right mouse button to view the edit options and click Paste cell(s).
Note: If you attempt to paste and at least one of the new numbers is out-of-range, you will receive the following message: "Cannot paste all items. Some values are out of range." When you click OK, EasyPower pastes the valid data and leave the other data unchanged.
Copy/Paste Style Contents: For some devices, a style may contain several spreadsheets or ranges of data. Copying all the data from one style to another is made easy by the Copy Style Contents feature. Move the pointer over the style name you want to copy data from and click the right mouse button. From the edit options that appears, click Copy Style Contents. This feature applies to LV Fuses, ICCB, and MCCB.
After copying style contents from one style to the clipboard, move the pointer over the style name you want to copy data to and click the right mouse button. From the edit options that appear, click Paste Style Contents. You can paste the style contents to a different style name in the same type or to a different type, manufacturer, or library. If you are pasting the data on the same spreadsheet you copied from, remember to create a unique style name first.
Copy/Paste Sensor Contents: This feature applies to solid state trip devices only. All of the data within a sensor description can be copied by placing the pointer over the frame name or row, clicking the right mouse button, and clicking Copy Sensor Contents.
Copy/Paste Frame Contents: This feature applies to MCCB, solid state trip, and non-solid state trip devices. All of the data within a frame description can be copied by placing the pointer over the frame name or row, clicking the right mouse button, and clicking Copy Frame Contents.
After copying the frame contents, you can paste it to another frame. If the new frame is in the same spreadsheet, it must have another name. You must type in the frame name before you can paste any data. Place the pointer over the new frame name or row, click the right mouse button, and click Paste Frame Contents.
Copy/Paste kV Contents: This feature applies to HV Fuses only. To copy the TCC data for all fuse sizes of a model and kV for an HV fuse, click on the button  . To paste the TCC data for all fuse sizes of a model and kV for an HV fuse from one kV to another or from one model to another, click on the button
  .
.
Copy/Paste Device Function Contents: This feature applies to relays only. To copy the device function contents of a relay from one device function to another, click the right mouse button with the pointer over the device function name from which you wish to copy. Select Copy Device Function Contents. To paste the contents to another device function, make sure that the device function name already exists. Device function names must be unique. Click the right mouse button with the pointer over the device function name to which you want to paste. Click Paste Device Function Contents. All the relay information is copied to be exactly the same.
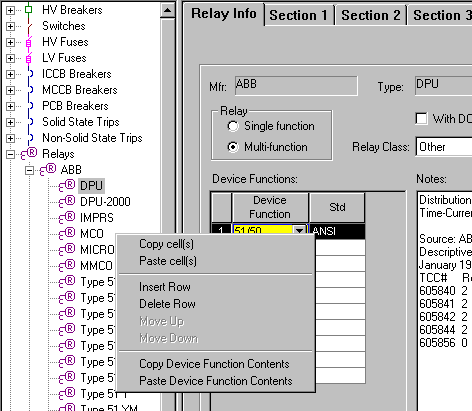
Figure 2: Copy and Paste Device Function Contents
Inserting Rows and Columns
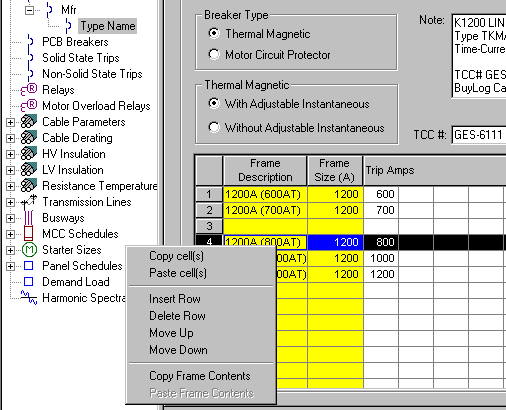
Figure 3: Inserting Rows
Insert Row: EasyPower gives you the ability to insert a row anywhere in the spreadsheets in the device library. Using the right mouse button, select the row or cell directly above which you want to insert the new row. From the edit options that appear, select Insert Row. The Insert Row menu feature may not be available for all spreadsheets. This is true for those spreadsheets in which the rows are sorted automatically by style names. In such cases a new row will automatically be created below the last row when data is entered in the last row.
Insert Column: You can expand some spreadsheets by inserting columns. Using the right mouse button, select the column to the left of which you want to insert the new column. From the edit options that appear, select Insert Column.
Moving Rows and Columns
Move Rows Up/Down: In some spreadsheets, rows can be moved up or down. Select a row by clicking the right mouse button. From the edit options that appear, click Move Up or Move Down to move the row.
Move Columns Left/Right: In some spreadsheets, columns can be moved left or right. Select a column by clicking the right mouse button. From the edit options that appear, click Move Left or Move Right to move the column.
Undo and Redo
The Undo and Redo features are not enabled in EasyPower Device Library. However, you may undo or redo recently made changes in the text edit fields or spreadsheets. To undo the data, change press CTRL+Z on the keyboard. To redo the change made by the undo action press CTRL+R.
More Information
| EasyPower Device Library | Updating a Customized Device Library |
| Creating New Library Components |