Impact Motor Starting
- Solve the initial power flow case. Those results are used as initial conditions for the current injection.
- Double-click the motor or MCC where you wish to place the additional starting load. A temporary motor data dialog will come up that looks similar to the following:
- Select the Start Motor check box, fill out the motor information, and click OK. Then click Solve Motor to start the solution, and the motor start results are displayed.
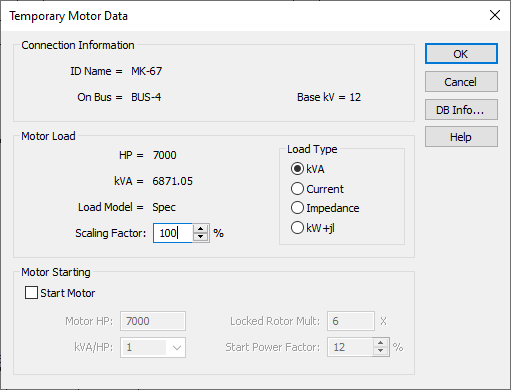
Figure 1: Temporary Motor Data Dialog Box
The motor starting HP is an additional load to the existing load model. The Motor Start choice will add a user-defined HP (actual locked rotor amps) to that load for the motor starting case only. The motor starting load does not affect the power flow load.
Important: When starting a motor, the scaling factor must be set appropriately. If you have modeled an individual 7000 HP motor and you want to start it, the Scaling Factor field needs to be set to zero to indicate that the motor is not currently running. If Scaling Factor is 100%, the program starts a 7000 HP motor on top of the 7000 HP motor already running. If you have an EasyPower motor modeled as a group of motors, you can specify the percentage of currently running motors in that group and then start a single motor within that group.
Example of Impact Motor Starting
For example, consider a motor where the existing motor load is 7000 HP at a scaling factor of 100 percent. The base case power flow results indicate a bus voltage of .993 per-unit with 5.676 MW and 1.866 MVAR flowing to the 7000 HP motor. This could also be shown as 5.975 MVA @ .95 power factor by changing the One-line Output.
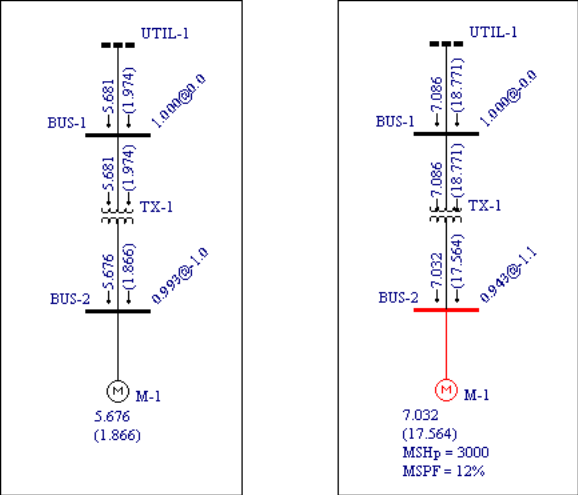
Figure 2: Base Case Power Flow and Impact Motor Starting Solution
For this case, a 3000 HP motor is being started. The existing 7000 HP motor load remains constant. Notice that the motor bus voltage has dropped to .943 per-unit, and the reactive flow has increased to 17.564 MVAR due to the highly lagging starting current. The starting motor HP and power factor are shown below the normal motor load.
Motor Starting with Starting Capacitors
In order to solve for motor starting with starting capacitors, we need to insert breakers or switches on the one-line upstream to the motor and the starting capacitor. See figure below. Before running power flow and motor start solutions, open the breaker. This allows a preliminary power flow calculation without the motor and capacitor connected. Run power flow and motor start solutions. Then close the breaker to connect the motor and starting capacitor. You now get the solution. To see the motor start solution without the starting capacitor, open the breaker to the capacitor.
Note that prior to EasyPower 11.0, the program always automatically solved power flow after the switch is closed and before you run solve motor to obtain the new source internal voltage Eq’. In this process, the capacitor impact has already been taken into account to get a comparatively speaking lower Eq’ because it is considered as in service before the motor really starts.
Starting from version 11.0, EasyPower offers an additional option to run solve motor with the source internal voltage Eq’ as-is without considering the effect of the starting capacitor because the source could not see the capacitor before the switch closes. With this version, it is more realistic and more optimistic.
You can find this option in the Power Flow Options on the Control tab.
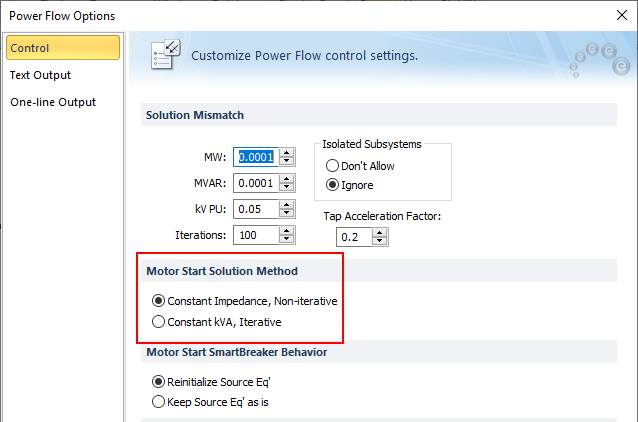
Figure 3: Motor Start Solution Method
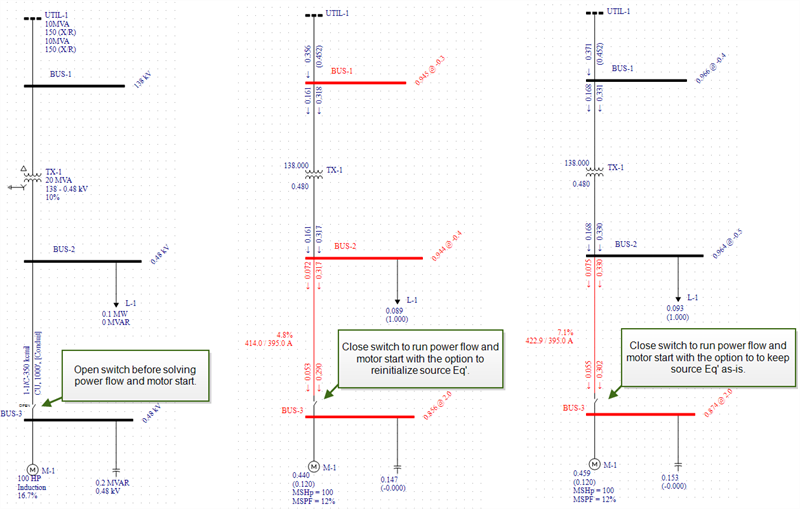
Figure 4: Motor Starting with Starting Capacitors and Solution - With Various Eq' Options