Panel Row Behaviors
Panel rows exhibit special behavior due to the nature of panel circuits. It is helpful to understand how EasyPower treats panel rows when you try to perform actions such as moving or deleting rows, or editing some of the row values.
About Panel Rows
The phases and number of poles for the circuit affect the panel row behavior. Below is an image of a three-phase panel with a mixture of poles. The phases appear diagonally for each row, with phase A in the first row in the first column, phase B in the second row in the second column, and phase C in the third row in the third column. This phase pattern repeats throughout the spreadsheet.
The number of poles indicates how the rows are grouped together to make up a circuit. For example, rows 13-17 are grouped because the number of poles is set to 3. Rows 19-21 are grouped together because the number of poles is set to 2. The remaining rows are all individual because the poles are set to 1.
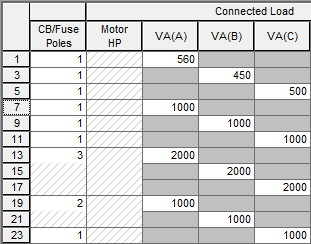
Figure 1: Panel Rows in 3 Phase (Detailed View)
Inserting Rows
You can insert a single pole row into the panel spreadsheet in a Detailed view. The row is inserted above the 1, 2, or 3 pole circuit. EasyPower maintains the diagonal pattern for VA as described in About Panel Rows. If you insert a row on one side of a panel spreadsheet, a new row is automatically added to the bottom of the opposite side of the spreadsheet to evenly balance the number of circuits.
To insert a row, select the first column of the row where you want to insert a new row, and then click  Insert Row from the panel spreadsheet toolbar. You can also right-click on the first column in the row and select Insert Row from the shortcut menu. The row is inserted above the selected row, and load values move to the next appropriate column.
Deleting Rows
You can delete a single pole row in the panel spreadsheet in a Detailed view, or in the last row of a Simplified view. When you delete a row on one side of a panel spreadsheet, the bottom row is automatically deleted from the opposite side to evenly balance the number of circuits. If the bottom row on the opposite side is a 2 or 3-pole circuit, you cannot delete the row.
To delete a row, select the first column of the row you want to delete, then right-click and select Delete Row from the shortcut menu. EasyPower maintains the diagonal pattern for loads as described in About Panel Rows.
Note that the  Clear Contents button in the panel spreadsheet toolbar, the Clear Contents shortcut menu, and the DELETE key do not delete a row. Instead, they clear the contents of a row.
Clearing Rows
To clear the rows on a spreadsheet, select the row and then do any of the following:
- Click the Clear Contents button in the panel spreadsheet toolbar
- Right-click on the row and click Clear Contents
- Press the DELETE key
This clears data from the row but does not delete the row. The number of poles is not cleared.
Moving Rows
You can move panel rows up or down in the spreadsheet in a Detailed view using the  Move buttons in the panel spreadsheet toolbar. 2 or 3-pole circuits are moved as a block by selecting the top row of the circuit. EasyPower maintains the diagonal pattern for load values as described in About Panel Rows.
Load Values in EasyPower Versions Prior to 10.2
Note that in versions of EasyPower prior to 10.2, it was possible to enter the load values on the same row. EasyPower allowed this and interpreted the values in the appropriate phases. Beginning with version 10.2, the values need to be put into the correct phase. If you open an older database and look at the panel schedule, you may find values in the same row in red. To correct this, simply delete the red text and type the value into the proper row.
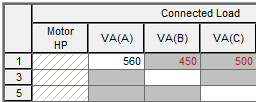
Figure 2: Load Values in Incorrect Phases
More Information
| Panel Data | Panel Spreadsheet Notes |
|
|