One-line Title Block Template Format
Precautions
We recommend that you understand XML before creating or editing templates. It is important to note that XML has a unique syntax, and if punctuation is missing (a “<” for example), then EasyPower will not be able to read the title block. Make sure you have a backup copy of your title block so you can revert back to it if needed.
Editing XML
Use a text editor such as Notepad to edit the title block. Title block template files have the file extension .eztbk (for one-line title blocks) and .eztbkd (for drawing title blocks). The easiest way to modify them is to right-click on the file in Windows Explorer, and then click Open With > Notepad. This allows you to edit the file as a text document and save it.
Important: If you are using Notepad, do not use the File > Save As option. This does not encode the document correctly. As a precaution, always make a copy of the file first in Windows Explorer and then open it with Notepad.
Title Block File Format
The title block template file is an XML file. This is a standard format for exchanging data for many web based and standalone applications and is easily extensible. The title block template uses a separate schema file named EasyPower_TitleBlock.xsd to validate the items and attributes.
Items can be defined in any order and attributes can be in any order.
There are 4 basic types of graphical objects that can be defined for title blocks: rectangles, lines, text and images. Each of these items has attributes that describe their positions, sizes, colors, and so on.
The general file format is shown below:
<?xml version="1.0" encoding="utf-8" ?>
<TitleBlock xmlns:xsi="http://www.w3.org/2001/XMLSchema-instance" xsi:noNamespaceSchemaLocation="EasyPower_Title_Block.xsd">
<TitleBlock>
>>> Title block item definitions go here
</TitleBlock>
Comments
Title block files can quickly become long, and it is recommended that you place comments throughout the title block file to label different sections. Most of the templates have comments to help find different sections.
Comment Syntax Example:
<!--comment-->
Coordinates
All the coordinates in the title block templates are in the units specified (inches or millimeters) with the origin (0,0) being in the top left corner. The x coordinate increases left to right while the y coordinate increases top to bottom.
- For one-line title blocks, there are no limits to how large a title block you can create. It can even be larger than the physical page you are printing on since you will have the option of scaling it down in the Print dialog box.
- For drawing title blocks, the title block can be up to as large as the physical page you are printing on.
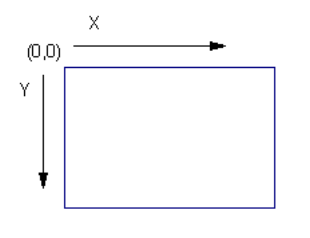
Figure 1: X and Y Coordinates
When defining attributes for the objects you define, some attributes are required such as positioning attributes. Others are optional and if not specified, defaults are used.
Settings
The Settings section enables you to specify certain settings for the title block and can have the following options.
Scale [Optional, Default = 0] Scaling for title block
0 = Automatic
1 = Manual
2 = Fit to right side (when selected, the ability to change the scale is not available from the Print dialog settings).
3 = Fit to bottom side (when selected, the ability to change the scale is not available from the Print dialog settings).
BorderWidth [Optional, default = 1] Width of print border rectangle lines. The standard range for border thickness is from 1 to 5.
Sample:
<Settings>
<Scale>0</Scale>
<BorderWidth>1</BorderWidth>
</Settings>
Units [Optional, default = inches]
inches
mm
Rectangles
Rectangles are simply boxes and can have the following attributes.
left [Required] Left coordinate of rectangle in the specified units
top [Required] Top coordinate of rectangle in the specified units
right [Required] Right coordinate of rectangle in the specified units
bottom [Required] Bottom coordinate of rectangle in the specified units
LineWidth [Optional, default =2] Width of the line around the rectangle
Color [Optional, default = 0 (black)] ARGB value of color of the rectangle line
The format is #AARRGGBB, for alpha (transparency), red, green, and blue. See Hex Colors for more information about setting color values.
Sample:
<Rect>
<left>0</left>
<top>0</top>
<right>7.25</right>
<bottom>0.75</bottom>
<LineWidth>2</LineWidth>
<Color>#ff000000</Color>
</Rect>
Lines
Lines can have the attributes described below. To draw a straight horizontal line, Y1 and Y2 are the same, and X1 and X2 set the beginning and ending points of the line. Similarly, to draw a vertical line, X1 and X2 are the same and Y1 and Y2 set the beginning and ending points of the line. To draw a diagonal line, specify the starting and ending X and Y coordinates.
X1 [Required] Starting x value in specified units
Y1 [Required] Starting y value in specified units
X2 [Required] Ending x value in specified units
Y2 [Required] Ending y value in specified units
LineWidth [Optional, default =2] Width of the line
LineStyle [Optional, default = 0] Style of the line
0 = Solid
1 = Dash
2 = Dot
3 = Dash Dot
4 = Dash Dot Dot
Color [Optional, default = 0 (black)] ARGB value of color of the line
The format is #AARRGGBB, for alpha (transparency), red, green, and blue. See Hex Colors for more information about setting color values.
Sample:
<Line>
<X1>0</X1>
<Y1>0</Y1>
<X2>7.25</X2>
<Y2>0.75</Y2>
<LineWidth>2</LineWidth>
<LineStyle>0</LineStyle >
<Color>#ff000000</Color>
</Line>
Text
Text can have the following attributes.
X [Required] Horizontal position of text in specified units
Y [Required] Vertical position of text in specified units
VAlign Vertical alignment of text. This determines how Y is interpreted.
Top Text is aligned above the Y coordinate
Center Text is centered vertically with the Y coordinate
Bottom Text is aligned below the Y coordinate
HAlign Horizontal alignment of text. This determines how X is interpreted.
Left The text starts at the X coordinate
Center Text is centered over the X coordinate
Right The text ends at the X coordinate
Label [Required] Text to display. This is static text unless the Prompt attribute is defined in which case this value is the default text.
Prompt [Optional] Prompt for label. Makes this text item a variable which is specified by the user in the Print dialog box.
FontName [Optional] Font face name [Default = Arial]
Name [Optional, but recommended] Field Name. This is a name that EasyPower uses to store the data for that particular field. The name field is also important because it allows changing to a different title block and retaining the data that was entered of fields that have the same name.
FontSize [Optional, default = 10] Font point size. To get a perfect fit you can use a decimal value such as 10.6 to fit a space.
Escapement [Optional, default = 0] Font escapement specified in 1/10 of an angle. So for 90 degree text you would specify 900.
Bold [Optional, default = 0] Bold font
0 = normal
1 = bold
Color [Optional, default = 0 (black)] ARGB value of color of the line
The format is #AARRGGBB, for alpha (transparency), red, green, and blue. See Hex Colors for more information about setting color values.
Sample:
<Text>
<X>3.625</X>
<Y>.25</Y>
<Alignment>30</Alignment>
<Color>#ff000000</Color>
<Label>CITY OF SEATTLE</Label>
<FontName>Arial</FontName>
<PointSize>10</PointSize>
<Escapement>0</Escapement>
<Bold>0</Bold>
<Italic>0</Italic>
</Text>
Image
Images are pictures and can have the following attributes. Images are automatically resized to fit the given rectangle while preserving the original aspect ratio of the image.
left [Required] Left coordinate of rectangle in inches
top [Required] Top coordinate of rectangle in inches
right [Required] Right coordinate of rectangle in inches
bottom [Required] Bottom coordinate of rectangle in inches
File [Required] Name and path of the graphics file. Supported files types are BMP, JPG, GIF, TIFF, PNG, ICO, WMF, EMF. If the file name is given without the path, then EasyPower looks for the file in the same folder where the title block file is located. You may also give the full path if known. If the file is not found, then the image is left blank.
Note: If no value is given (for example, <Image></Image>), then the file can be selected later from the Print dialog box (for one-line title blocks) or the Drawing Properties dialog box on the Title Block tab (for drawing title blocks).
Prompt [Optional] Enables you to set or change the image from Print dialog box (for one-line title blocks) or the Drawing Properties dialog box on the Title Block tab (for drawing title blocks).
Name [Optional, but recommended] The field name. This is a name that EasyPower uses to store the data for that particular field. The name field is also important because it allows changing to a different title block and retaining the data that was entered of fields that have the same name.
Sample:
<Image>
<left>0</left>
<top>0</top>
<right>7.25</right>
<bottom>0.75</bottom>
<File>d:\pictures\logo.jpg</File >
<Prompt>Logo image</ Prompt >
</Image>
More Information
| Printing and Plotting | |
| Title Block |