 Note in the Equipment Palette toolbox (toolbar menu: Insert > Note). The selection pointer appears. Hold the left mouse button while dragging to create a note outline box on the one-line. You can adjust the size and shape later, if needed.
Notes are used to annotate your one-line with additional text information. They are very flexible in their font, size, style, border, and colors. Notes can optionally include leaders that point to specific locations on the one-line.
To add a note to your one-line diagram, click Note in the Equipment Palette toolbox (toolbar menu: Insert > Note). The selection pointer appears. Hold the left mouse button while dragging to create a note outline box on the one-line. You can adjust the size and shape later, if needed.
You can type a note of up to 325 characters inside the note outline.The program automatically wraps to the next line when needed, but you can also press ENTER to start a new line. When you click outside the note, the outline disappears and your note is saved.
To edit the text in a note, first select the note by clicking somewhere inside the note text. You will see the outline box, but not the flashing insertion pointer. Click again near where you want to change the text, and you will see the flashing insertion pointer like you had when the note was first created. You can also right-click on a note and select Edit.
Make your changes using the arrow and Home, End, and Delete keys. To edit the note, use CTRL+X for cut, CTRL+C for copy, and CTRL+V for paste. You can also right-click and use the menu options.
Hold, slide and release the left mouse button to drag a note to another location.
To resize a note, click anywhere in the note text. You can drag the eight handles (small squares at the box corners and sides) to change the size and shape of the note's outline box. The words in your note are automatically reformatted to fill the new space. If you make the outline box too small you will not be able to see all of the note.
Please see Text Size and TrueType for an important discussion of how TrueType affects the right‑hand side of text.
To delete a note, select it by either clicking on it once or by dragging a rectangle around it. Delete it using  from the ribbon (toolbar menu: Edit > Delete) or by pressing DELETE.
If you clicked on the note twice and have the flashing insertion pointer, the DELETE key erases the character to the right of the pointer. If your intent is to delete the entire note, click outside the outline box, then click on the note just once to select it. You can now delete the note as described above.
To add a note which specifically points to something on your one‑line, click  Note with Leader from the palette (toolbar menu: Edit > Add Note With Leader). Hold the left mouse button to set the leader's pointing arrow at the target location, and drag to the location where you want the note outline box. You can drag and resize the note's outline box later as described in Dragging and Resizing a Note.
When this type of note is selected, you will see an additional handle at the tip of the leader's pointing arrow. You can drag this handle to change the location of the pointer.
Note properties are the various visual properties that apply to a note. For example, the font, size, and color are some of the properties you can set. A note's properties apply to all of the characters in that note.
Double‑click on the edge of a note to bring up the Note Properties dialog box. You can also right-click while in the note, and select Note Format. If using the toolbar view, you can select the note and click the Format > Note from the menu.
For information on specific settings, see Note Properties.
To select many notes in one operation, click Find-Select > Query (toolbar menu: Edit > Query). You can optionally search for notes that contain specific text, and you can restrict the region of the one‑line to view. See Querying to Select for more information.
EasyPower supports Windows TrueType fonts for its text display. This makes it possible for EasyPower to display text many times faster than traditional CAD programs, since those programs display text stroke‑by‑stroke. In comparison, EasyPower can blast out an entire TrueType character in one operation.
The big advantage of using TrueType is speed. However, there is one characteristic of Windows TrueType that you should be aware of. When EasyPower is ready to display text, it tells Windows that it needs a screen font of a certain size. Windows responds by scaling the chosen font in order to satisfy the size requirements.
However, since TrueType font size rounds to the nearest point, the on-screen text might be a slightly different actual size relative to surrounding lines and symbols. (A point, used to measure font height in the printing industry, is approximately 0.014 inches.) Height-wise, this difference is unnoticeable. In the width, however, the slight difference accumulates over the entire text string. This can make the text wider or narrower for different zoom factors, especially for long text like "This motor is on-line during day shift only."
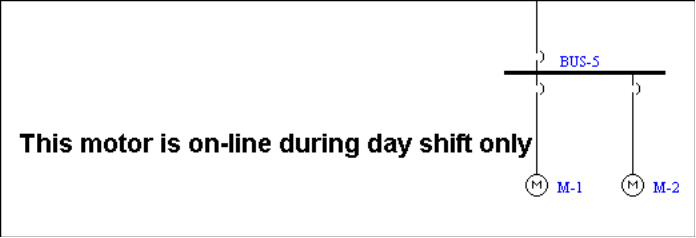
Figure 1: Long Text String Viewed at 100%
EasyPower positions text with the upper-left corner, so while that corner will remain fixed relative to lines and symbols, the end location of a text string is less predictable.
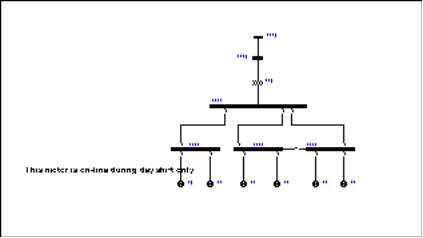
Figure 2: Same Text String Viewed at 30%—Notice Overlap
You can minimize the impact of this TrueType characteristic by keeping the right‑hand side of text away from lines and symbols. In other words, do not position text next to symbols on the right. Also, shorter lines of text are less affected than longer lines.
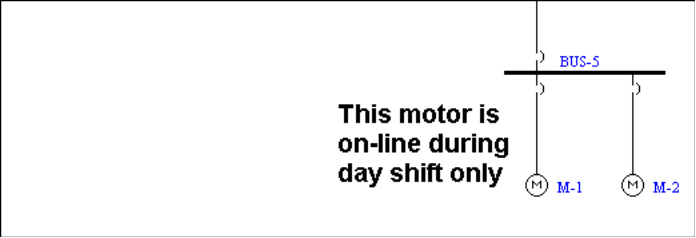
Figure 3: Shorter Lines of Text, Not Positioned Next to Symbol, Viewed at 100%
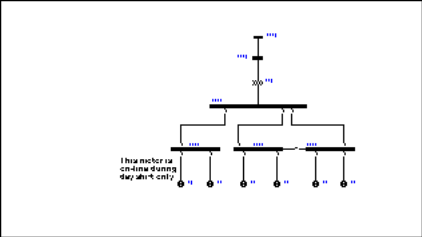
Figure 4: Same Text String Viewed at 30%—Overlap Gone
| Making One‑line Diagrams | |
| Note Properties |