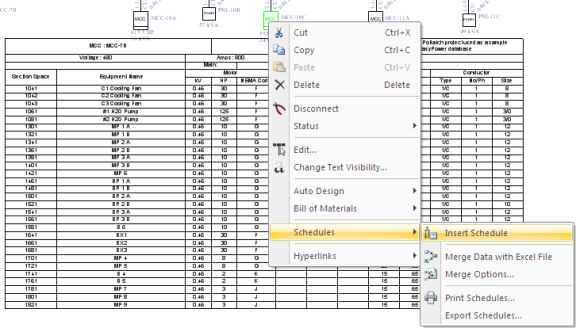
You can insert schedules of panels, MCC and buses in the one line.
To insert a schedule:
Tip: To insert schedules for multiple items at one time, select the items with the mouse while holding down the SHIFT key.
Figure 1: Inserting an MCC Schedule in the One-line
You can change the drawing scale of schedules in the equipment options.
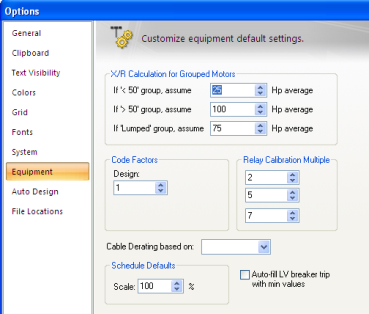
Figure 2: Schedule Default Scale in Options Dialog Box
To delete the schedules from the one-line, select the schedule and press DELETE.
You can export the schedules of MCC, panels, and buses to Excel files, as follows:
Tip: To select multiple equipment items, select the items with the mouse while holding down the SHIFT key.
After the file has been created, you can repeat the process to add more schedules to it. Each equipment schedule is placed in separate sheets within the same Excel file. The sheet is named with the ID name of the bus, MCC, or panel. If you merge the schedule data twice, this overwrites the previous data. You can format the sheets or cells in the Excel files. The format remains the same even if the data is updated.
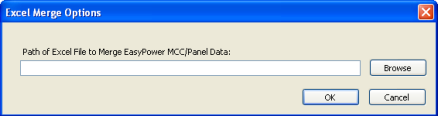
Figure 3: Excel Merge Options for Schedules
To print schedules, right-click on the bus, MCC or panel, and select Schedules > Print Schedules. Select the items for which you want to print the schedules, and then click OK.
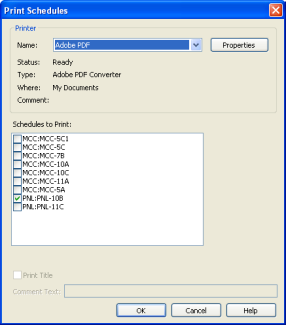
Figure 4: Print Schedules Dialog Box
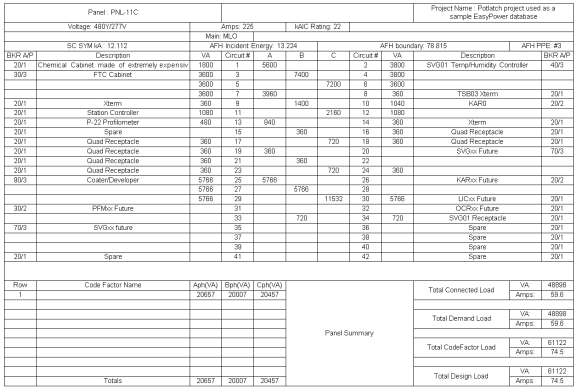
Figure 5: Printout of a Panel Schedule
You can display the short circuit currents and arc flash hazard results in panel schedules.
You can export schedules to DXF or XML files. AutoCAD can read DXF files and Excel can read XML files. Right-click on the MCC, panel or bus, and choose Schedules > Export Schedules. You can specify the path for the export file, the name, and the type of file. If you have multiple schedules, you can export them to the same file or to separate files.
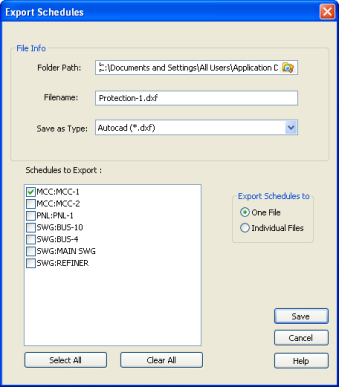
Figure 6: Export Schedules Dialog Box
The schedules can be customized through templates. The schedule templates are text files with XML language you can edit with Notepad or a similar text editor. The file name extensions for schedule templates are as follows:
The default schedule templates are stored based on settings in Tools > Options > File Locations. You can choose the default schedule you want to use here.
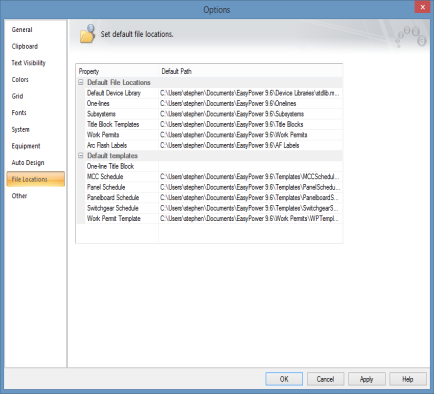
Figure 7: Options Dialog Box—Default Templates
You can also choose templates that are file specific, meaning they are associated with this database file. This overrides any related template settings in File Locations for only this database. If you select a file-specific template, this updates existing schedules associated with this file to the new template.
Note: When you specify a template file, the program takes a "snapshot" of the file at that point in time and uses it to update existing schedules and new schedules created from that point on. If you later modify the template, those changes are not reflected in the schedules—you must select the template again to update the schedules. Also note that each time you browse to select a template, it starts at the default template location specified in File Locations and not at the location of the last file you specified.
To do this:
 EasyPower button and then click Properties (toolbar menu: File > Properties).
  Browse to the far right of Currently Loaded Templates to browse to the file location and select the file.

Figure 8: File Properties—Schedule Template
Before you create a new schedule template it is important to plan the layout. You need to determine the number of columns and the width of each column. We recommend you make a copy of one of the existing templates and modify it, rather than starting from scratch. Pay close attention to syntax such as < > / “ %. If one character of syntax is missing, the schedule template may not function correctly. It is a good idea to save backup copies so you can go back if you have trouble identifying why the template is not working.
After the opening the template in Notepad or a similar text editor, scroll to the properties section in the template file. The number of columns is defined first. In this document all the samples are from the default panelboard schedule.
Example:
<Column width =".9"/>
<Column width ="2.4"/>
<Column width ="0.6"/>
<Column width ="0.6"/>
<Column width =".9"/>
<Column width =".9"/>
<Column width =".9"/>
<Column width =".9"/>
<Column width ="0.4"/>
<Column width ="0.4"/>
<Column width ="0.6"/>
<Column width ="0.6"/>
<Column width ="0.6"/>
<Column width ="0.6"/>
<Column width ="0.6"/>
In this example, a total of 15 columns will be created because there are 15 lines. It may be helpful to imagine setting up a spreadsheet and setting the column width. For simplicity, you may want to make all the columns the same width. It is also important to remember that you can merge 2 or more columns together to create a larger text block.
After a section for settings, the schedule formatting begins.
Example:
<tr valign = "Top" >
<th rowspan = "2" colspan = "3">Type : %SwitchType%</th>
<th rowspan = "2" colspan = "3">Name : %Name% </th>
<th rowspan = "2" colspan = "9">Manufacturer : %Manufacturer%</th>
</tr>
<tr>
</tr>
Notice that the tag <tr> begins a new row in the schedule and </tr> ends that row. Within the first row, observe that rowspan and colspan attributes are used to create larger boxes for text in the schedule. If you use the rowspan attribute you must create empty rows below to merge with according to the number in quotes after the rowspan attribute. In the example above, one empty row is created with <tr> </tr> at the end. The words inside the percent (%) symbol are variables that reference data from the EasyPower database. See Schedule Variables for a full list of variables for each template.
The grid is the main part of the template where most of the data will be. The key to the grid is the use of <nextrow/> toward the bottom. This command goes through all the equipment data for that template and generates as many rows as necessary and populates them with the available data.
<grid>
<tr align = "Center" valign = "Center">
<td >%FeederID%</td>
<td >%Description%</td>
<td >%Type%</td>
<td >%DeviceRating%</td>
<td >%BrkrMfg%</td>
<td >%BrkrStyle%</td>
<td >%TripMfg%</td>
<td >%TripStyle%</td>
<td >%TripSensor%</td>
<td >%TripPlug%</td>
<td >%CondRating%</td>
<td >%ConnVA%</td>
<td >%DemandVA%</td>
<td >%CodeVA%</td>
<td >%DesignVA%</td>
<nextrow />
</tr>
</grid>
| Making One‑line Diagrams | |
| Selecting Items | |
| Schedule Variables |