Add Equipment to the One-line
Adding a Transformer
- Click
 Two Winding Transformer on the Equipment Palette or Insert tab—the pointer changes to a two winding transformer symbol.
 - Place the transformer by positioning the transformer pointer's top leader on the top bus and clicking once. The transformer
automatically attaches to the bus, and the top half of the symbol turns black. If you miss (the transformer doesn't
connect and remains red), switch back to the select pointer
 if needed and drag the symbol into position.
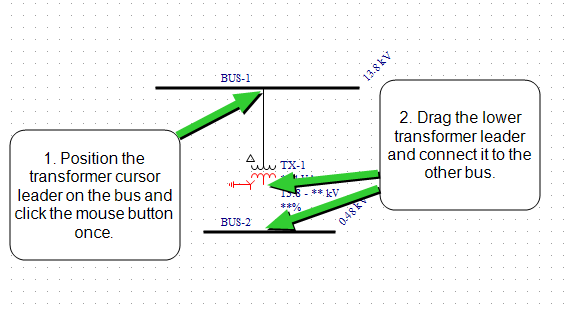
Figure 1: Adding a Transformer
- With the select pointer active, use the left mouse button to drag the transformer's
remaining leader to the middle bus (see figure above). The transformer stays red until it is connected. After it connects, you can drag the transformer symbol up so it is centered
between the two buses, if needed.
![]()
Figure 2: Transformer Connected at Both Ends
Adding Cables
- Click
 Cable on the Equipment Palette—the pointer changes into a crosshair. Put the crosshair on
the middle bus and click the left mouse button (but don't release it yet). This sets one end of the line. Now drag the
crosshair to the left bottom bus (as shown in the figure below) and release the mouse button. This places the cable.
Cable on the Equipment Palette—the pointer changes into a crosshair. Put the crosshair on
the middle bus and click the left mouse button (but don't release it yet). This sets one end of the line. Now drag the
crosshair to the left bottom bus (as shown in the figure below) and release the mouse button. This places the cable.
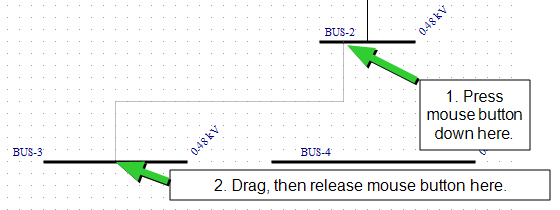
Figure 3: Adding Cables
- Repeat this for the other cables. Note that you can move the cables by dragging them with the select pointer.
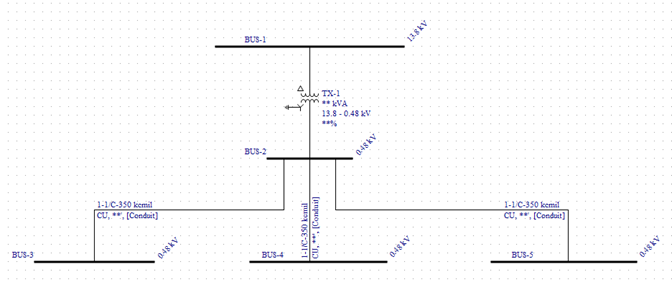
Figure 4: Cables Added
Adding Motors
- Click
 Motor on the Equipment Palette—the pointer changes into a motor symbol.
 - Place the first motor by positioning the motor pointer's leader on the bottom left bus and clicking. The motor automatically attaches to the bus, and the symbol turns black. If you miss (the motor doesn't connect and turns red), drag the symbol into position after pressing the button.
- Continue by attaching a second motor to the bus.
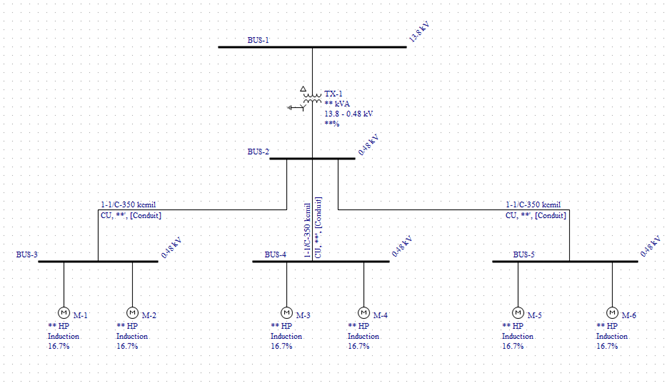
Figure 5: Adding Motors
Adding a Utility
- Click
 Utility on the Equipment Palette—the pointer changes into a utility symbol.
 - Place the utility by positioning the utility pointer's leader on the top bus and clicking.

Figure 6: Adding a Utility
Adding Feeder Breakers
- Click
 LV Breaker on the Equipment Palette or Insert tab—the pointer changes into a low voltage breaker
symbol.
LV Breaker on the Equipment Palette or Insert tab—the pointer changes into a low voltage breaker
symbol. - Position the breaker pointer directly over a feeder line (such as a cable or transformer) and click the left mouse button (see
figure below). The breaker is inserted into the line.
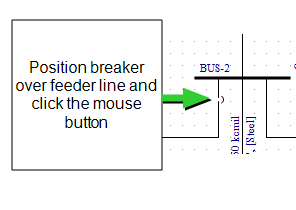
Figure 7: Adding Feeder Breakers
- If you miss (the breaker doesn't insert into the line and remains red), drag the breaker to the feeder line and release the mouse button so that the breaker is connected to the feeder.
- Place low voltage breakers on the feeder lines between the equipment items.
Continue by placing the breakers shown here.
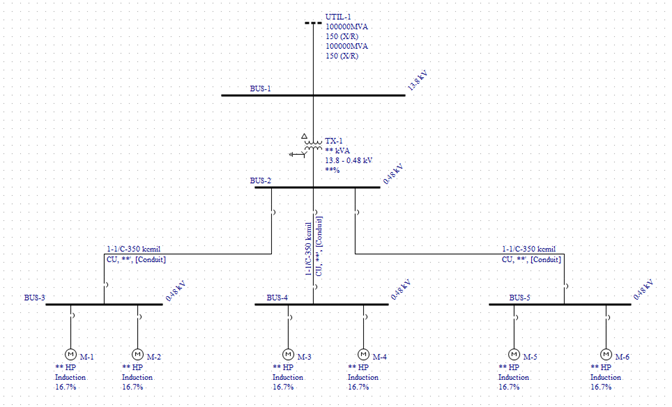
Figure 8: LV Breakers Added
Tip: You can move the breaker in vertical or horizontal directions on the one-line by dragging it with the mouse.
Adding a Tie Breaker
Click LV Breaker. Place the breaker by positioning the top leader of the breaker on the right end of the bottom middle bus and clicking once (see diagram below). The breaker automatically attaches to the bus. If the breaker remains red and does not connect, use the selection pointer to drag the symbol into position.
Right-click on the breaker you just added. Select Rotate > 90°. The breaker orientation changes from vertical to horizontal. At the same time, the connection type of the breaker changes from feeder breaker to bus tie breaker. Drag the tie breaker's remaining leader to the bottom right bus. After it connects, drag the tie breaker's symbol so it is centered between the two buses.
You can also add a vertical tie breaker between two buses if one bus is above the other. In this case, the orientation of the breaker does not need to change.
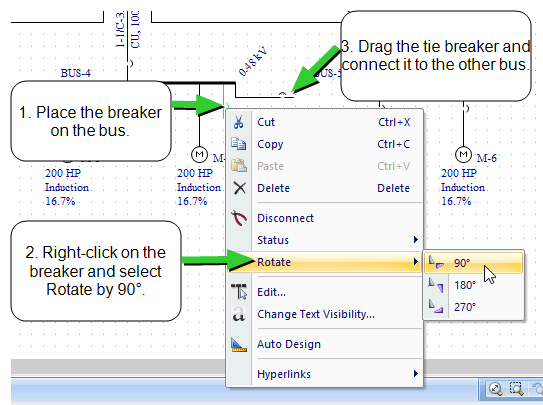
Figure 9: Adding Tie Breaker
Double-click the tie breaker to open the LV Breaker Data dialog box. Set the breaker to Open and click OK. This makes it a normally open tie breaker.
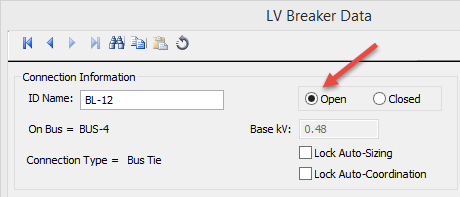
Figure 10: Open Tie Breaker
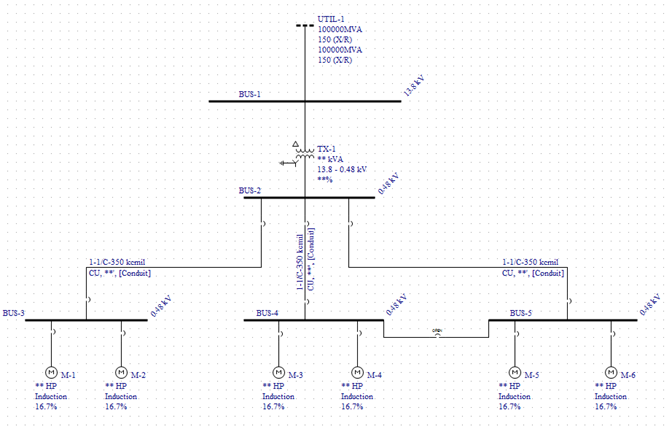
Figure 11: Tie Breaker Added