编辑符号文件
导出一个用于定制的符号文件后,您可以使用任何标准文本编辑器(如记事本)编辑符号文件。下面显示了用于定制实用程序的部分说明的示例。
我们建议您为EasyPower定义的符号开始,并对其进行增量更改,以便您可以看到您的更改对该符号的影响。这将帮助您熟悉这些符号是如何构建的,以及如何更改它们。
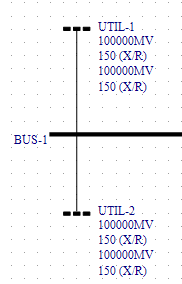
下图显示两个电网符号:一个在上(“AboveBus”),另一个在下面(“BelowBus”)。

图11-1:两个电网,上和下节点
注释: 有时,术语“垂直”、“垂直翻转”、“水平”和“地平线”被用来描述在母线参考时的方向。
如上所示,一个符号可以有多个方向。对于交流和直流,以及不同的设备配置,也可以有不同的符号。
上图中显示的两个实用符号的文件信息如下所示。
<Equipment Type="Utility">
<GraphicDefinition AcadBlockName="UT_AB" CurrentType="AC" DefaultSpacing="8" Orientation="AboveBus" SubType="AC">
<SnapPoint X="12" Y="2" />
<ConnectionPoint X="12" Y="24" />
<TextTemplate>
<Text Block="IdName" HorizontalAlignment="Left" Justification="Left" VerticalAlignment="Top" X="28" Y="-8" />
</TextTemplate>
<符号模板>
<Rectangle Left="0" Top="0" Width="6" Height="3" FillStyle="Solid" />
<Rectangle Left="9" Top="0" Width="6" Height="3" FillStyle="Solid" />
<Rectangle Left="18" Top="0" Width="6" Height="3" FillStyle="Solid" />
<Line X1="12" Y1="24" X2="12" Y2="3" />
</符号模板>
</GraphicDefinition>
<GraphicDefinition AcadBlockName="UT_BB" CurrentType="AC" DefaultSpacing="8" Orientation="BelowBus" SubType="AC">
<SnapPoint X="12" Y="17" />
<ConnectionPoint X="12" Y="0" />
<符号模板>
<Rectangle Left="0" Top="16" Width="6" Height="3" FillStyle="Solid" />
<Rectangle Left="9" Top="16" Width="6" Height="3" FillStyle="Solid" />
<Rectangle Left="18" Top="16" Width="6" Height="3" FillStyle="Solid" />
<Line X1="12" Y1="0" X2="12" Y2="15" />
</符号模板>
</GraphicDefinition>
</Equipment>
